
This how-to is based on the advanced how-to of MPS Diagrams that can be found here. There, context hint and ports of the de.itemis.mps.editor.diagrams language were introduced. In this how-to we are going to enhance the existing example with additional features, such as Build Script usage for MPS-Extensions, custom shapes and edge labelling.
Build Script Usage for MPS-Extensions
If you want to use your build script with project depending on the MPS-Extensions, the following steps tutorial will guide you through the necessary steps.
First you have to direct MPS to the location of the MPS-Extensions plugin folders. As I have installed it into the MPS IDE the folder lays in the $mps_home/plugins path. An example setup for the macros section can be found in the screenshot below.
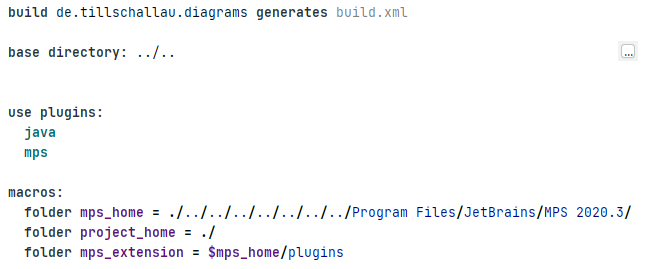
By setting the variables for the mps_home and mps_extension here, it is then easy to call the Ant script with other locations. To update the runtime variables just add the variable override options to your ant call: ant -Dmps_home=${mps} -Dmps_extension=${extension}.
Now that the plugin folder location is correctly set, the necessary dependencies have to be added to the build solution. Open the Module Properties of your build solution (by right clicking the solution and selection Module Properties) and switch to the Dependencies tab. In there click on the small + and add the de.itemis.mps.extensions.build solution. The resulting screen is shown below:

Now add the de.itemis.mps.extensions.build model to your build script model as a dependency. You can do this by either right-clicking on your model (in which your build script definition lays) and adding the model there, or by using the Import model popup (Win: Ctrl+M, MacOs: ⌘+M). The latter is shown as an example in the following screenshot.

The final step to get your build script to run again with MPS-Extensions you have to add the dependency into the build script itself. For this we add a new dependency entry de.itemis.mps.extensions (artifacts locations $mps_extensions). As you can see here, we use the already defined $mps_extensions macro from above that allows us more flexibility. The filled in dependencies block is shown below.

Coming Soon
custom shapes and edge labelling.